(Please note this article is very out-of-date as D-Link trickled out a new version of software for this router which changes its ipv6 functionality and completely fixes the ipv6 router advertisement issue – here is an EU beta version that I found after scouring the d-link forums: DIR-825 2.05EU, and I think the US version is available from the US ftp site too.)
My cable router died so I took the opportunity to replace it with something good. I grabbed a D-Link DIR-825 (revision B) since I knew it supported IPv6 natively after doing lots of research and finding an excellent list on SixXS.net. It was a bit pricey (£120) but I believe it was worth it for the massive feature set – including the quad-band wireless which proved excellent.
Set-up was super easy. As with most cable setups, just plug it in to the modem and you’re away since there’s no mess with internet credentials, at least in my case anyway.
Now the IPv6 bit. I have a subnet obtained from Hurrican Electric’s Tunnel Broker and when you’re given a subnet they offer you a /64 subnet, and a routed /48 subnet as well. You should only need the /64 subnet, but you can get the /48 as well if you like, we won’t use it here.
Assuming you’ve signed up at HE and acquired an IPv6 subnet, keep the tunnel details page handy so you can use them in the admin interface of the router.
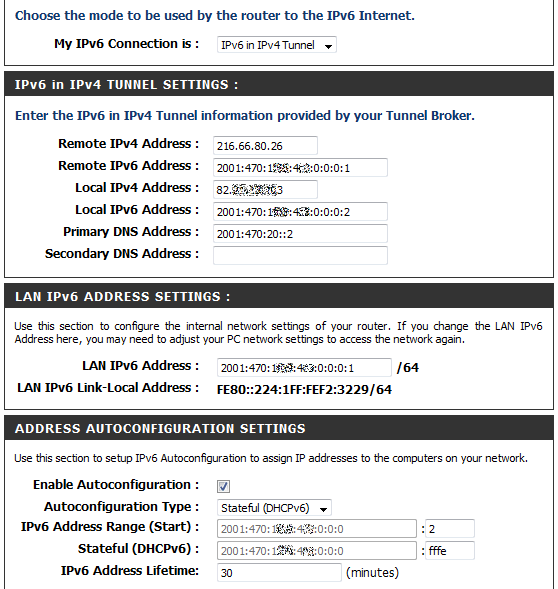
In the advanced section of the DIR-825 switch to the IPv6 page. Then change the connection type to “IPv6 in IPv4 tunnel”. Now we start entering addresses…
The remote and local addresses match up with the addresses on the tunnel details page, so for the Remote IPv4 address use the “Server IPv4 address” from the tunnel details page, Remote IPv6 address is the “Server IPv6 address”, and so on for the local addresses, using the “Client” addresses.
Key here is making sure you don’t include the “/64” bit and also remember to not use the short notation for the v6 addresses. For example if you have a server ipv6 address that says: “2001:470:1234:567::1/64” you should instead enter “2001:470:1234:567:0:0:0:1″. That’s because IPv6 addresses are usually given in a more human-readable format and they miss out the pointless bits, like the zero-sections at the end (where shorthand like :: is used to mean :0:0:0: ). Do the same for the client IPv6 address too.
Now you want to type in your routed /64 address in to the LAN IPv6 Address for the router. The tunnel details page will just give you a subnet notation (e.g. 2001:470:1235:567::/64) so stick a 1 on the end before the /64 and that’ll be your router’s internal LAN address, (e.g. 2001:470:1235:567:0:0:0:1). Notice that the 3rd section of the address will be 1 number higher than your client IPv6 subnet.
Finally in the address auto-configuration section, check the enable auto-configuration box and switch to Stateful (DHCP v6). This will give IPv6 addresses to your clients that support DHCPv6. I believe you don’t have to do this, and you can use stateless to do it as well, but I wanted fully public IPv6 address, so I went for stateful in my case.
And so finally we click the Save Settings button at the top, and you’re done! Time to test it out. Try ipv6.google.com for starters 🙂
Ocassionally it doesn’t work. If not check on the tunnelbroker.net site and make sure you router’s wan ip address is listed on the tunnel details page. If it isn’t you need to get that filled in, so click the link next to the client ipv4 address entry and fill it in. Hopefully you have a static IP don’t you…?! There does seem to be a way of dynamically updating the client ipv4 address with hurricane electric, but that would still mean updating the config on the router which would be annoying of course.
Here’s a sanitised screen-shot of my router config for reference:

Added on 20th Feb 2011: I realised recently that IPv6 wasn’t quite working all of the time on my computers served by my router and after extensive investigation I discovered that the router wasn’t advertising it’s link-local address often enough (or at all). As a result my IPv6 clients were finding they didn’t have the necessary routes to talk IPv6 to the internet.
The solution turned out to be to add a persistent static route to the IPv6 internet via the internal Link-Local address of the router.
Here’s the fix, just run it from an admin cmd prompt, and replace the [link-local address] section with your router’s link-local address (which you can find on the ipv6 config page):
route -p add ::/0 [link-local address]